Regular cleaning is essential to ensure your rifle operates reliably, maintains accuracy, and has a prolonged lifespan. This guide provides detailed instructions on how to clean your rifle safely and effectively.
Essential Tools and Materials
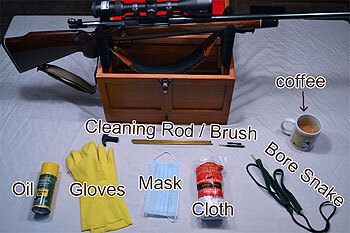
Before you begin, gather the following items:
-
Safety Gear: Nitrile gloves, safety glasses, and a face mask or respirator to protect against solvent fumes.
-
Cleaning Supplies:
-
Cleaning rod with appropriate caliber-specific bore brush and jag or slotted tip.
-
Bore guide to protect the chamber and bore.
-
Cleaning patches.
-
Quality bore solvent (e.g., Hoppe's No. 9, Shooter's Choice).
-
Copper solvent (if needed for copper fouling).
-
Gun oil or lubricant.
-
Nylon or brass utility brush.
-
Lint-free cloths or microfiber towels.
-
-
Additional Items:
-
Gun vise or a stable surface to secure the rifle.
-
Small container to hold small parts during disassembly.
-
Step 1: Ensure Safety
-
Unload the Rifle: Remove the magazine (if applicable) and check the chamber to confirm the rifle is unloaded.
-
Work in a Safe Environment: Choose a well-ventilated area free from distractions. Ensure no ammunition is present in the cleaning area.
Step 2: Disassemble the Rifle
-
Consult the Manual: Refer to your rifle's manual for specific disassembly instructions.
-
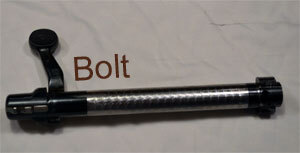
Remove the Bolt: For bolt-action rifles, open the bolt and remove it from the receiver.
-
Secure Small Parts: Place small components in a container to prevent loss.
Step 3: Clean the Bolt and Action
-
Apply Solvent: Use a nylon brush and solvent to scrub the bolt, paying attention to the bolt face and lugs.
-
Wipe Clean: Use a clean cloth to remove loosened debris and solvent.
-
Inspect: Check for signs of wear or damage.
Once the bolt is out of the rifle, generously spray it with cleaning solvent and set it aside on a paper towel to dry.
Next, take the unloaded rifle and run the cleaning rod right through it, so that it travels from one end of the rifle to the other. Once it is straight through, attach the bore brush. Spray the bore brush with cleaning solvent and run this brush through the barrel.
If you have a new gun, one run-through is enough, but if your gun is older, you can run it through two times. The barrel should then be well covered with the solvent.
Step 4: Clean the Barrel
-
Insert Bore Guide: Place a bore guide into the chamber to protect the bore and prevent solvent from entering the action.
-
Apply Solvent: Soak a cleaning patch with bore solvent and run it through the barrel from chamber to muzzle.
-
Brush the Bore: Attach a bore brush to the cleaning rod, apply solvent, and run it through the barrel several times.
-
Patch the Bore: Run clean patches through the barrel until they come out clean.
-
Copper Fouling (if applicable): If you suspect copper fouling, apply a copper solvent following the manufacturer's instructions, then patch the bore until clean.
This step should be repeated several times. Following this, the bore brush should be removed, and the slotted end attached to the cleaning rod. A cotton patch should be threaded through the slotted end. Pass this once straight through the barrel. While the rod is still within the barrel, take out the dirty cotton patch. It will be green or a shade of black in color. Replace it with a new cotton patch and pull the slotted end through the barrel once more.
Revert to the bore brush and repeat the process to run it through the rifle several times. Take off the bore brush.
Soak some cotton patches with solvent, and after attaching the slotted end to the cleaning rod, run these cotton patches down the barrel.
Step 5: Lubricate
-
Apply Lubricant: Lightly oil the bolt, bolt lugs, and other moving parts as specified in your rifle's manual.
-
Wipe Excess: Remove any excess oil to prevent attracting dirt and debris.
Step 6: Reassemble and Function Check
Now, check on your drying bolt. If it seems dry, use the cotton cloth to check for any excess solvent.
The final step is to take a clean swab and put some gun oil on it. This needs to be run through the barrel. With a cotton cloth and a few drops of oil, rub down the bolt.
-
Reassemble: Put the rifle back together according to the manual.
-
Function Check: Ensure the bolt cycles smoothly and the safety functions correctly.
Remember that once you have fired your rifle, there will always be some residue left behind even after cleaning.
Step 7: Final Wipe Down and Storage
-
Exterior Cleaning: Wipe down the rifle's exterior with a lightly oiled cloth to protect against rust.
-
Store Properly: Store the rifle in a cool, dry place, preferably in a gun safe or cabinet.
Maintenance Tips
-
Cleaning Frequency: Clean your rifle after each use, especially after firing corrosive ammunition or exposure to moisture.
-
Regular Inspection: Periodically inspect your rifle for signs of wear, corrosion, or damage.
-
Use Quality Products: Invest in high-quality cleaning supplies to ensure effective maintenance.